To create a brand portal, work in this order: pick the first audience and the requests they send the brand team, audit and clean your files, set up a small structure with a short tag list, put the brand guidelines online next to the files, decide who can see and change what, make the portal look like your brand, test it with a few real users, and then launch it with a named owner and a review routine. The steps below explain what each one produces, who usually owns it and how you know it is done.
A brand portal is one online place where your guidelines and approved brand files live together, so colleagues and outside partners can help themselves instead of emailing the brand team. If you need the longer explanation first, start with a plain-language definition of a brand portal. This guide skips the theory and focuses on the setup. You can assemble a portal from the shared folders and pages you already use, build your own, or set one up in a ready-made service such as Brandportal, which hosts brand guidelines and approved files in one shared portal; the build vs buy section below compares the three routes.
Here is the full sequence at a glance:
- Define the scope and the first audience.
- Audit and clean the asset inventory.
- Set up the structure, collections and tags.
- Put the brand guidelines online.
- Set access levels and user roles.
- Brand the portal and connect it to where people work.
- Run a pilot, then launch audience by audience.
- Name an owner and set up upkeep.
Teams that jump straight to launch usually end up with one of two results: an empty site nobody visits, or a copy of the messy shared drive at a new address. The early steps take the most thought, and they decide whether people trust the portal later.
Step 1: Define the Scope and the First Audience
Don't build for everyone on day one. Start with the group that sends the brand team the most requests, and list the jobs they come to you for today.
Look at your inbox and chat history for the last few weeks. Typical requests are "Where is the current logo?", "Do we have a slide template for this?", "Can I get the approved product description?" and "Which photo can I use for this post?". Sales may need the latest deck, an agency may need a vector logo with a transparent background, and a regional marketer may need a localized template.
Write down the most common requests and who sends them. That list is the scope of version one. If sales and outside partners send most of the requests, build for them first and add the rest later. A portal that answers the five most common requests well is more useful than one that tries to hold everything and answers none of them clearly.
What this step produces: a short list of first users and the files and answers they need most.
Step 2: Audit and Clean Your Assets
Never migrate files just because they exist. Moving a disorganized drive into a new system gives you the same disorder in a new place.
Before you upload anything, go through the inventory and make one decision for every file:
- Publish: current, approved and useful to the first audience.
- Restrict: needed, but only by certain people, such as source files for designers or assets under embargo.
- Archive: replaced or out of date, but worth keeping for the record.
- Delete: duplicates, drafts and files nobody can identify.
Retire old logo versions and old templates as part of this pass, not later. Check the usage rights on photography, video, illustrations and fonts, and note any license limits or expiry dates. If a licensed image expires soon or is limited to one campaign, keep it out of the general library or mark it clearly.
What this step produces: a clean set of approved files, a separate archive, and a record of which assets have usage limits.
Step 3: Set Up the Structure, Collections and Tags
Keep the structure simple. Group files into a small set of broad collections that match how your users think, such as logos, colors and typography, templates, photography, video, campaigns and copy. Users who are not designers should be able to guess where a file lives without help.
Add a short, controlled list of tags or metadata fields on top of the collections. Useful ones are asset type, campaign, product or product line, region or language, approval status, and usage rights or expiry date. Stop there. Every extra field slows down the people who upload files, and inconsistent tags make search worse, not better.
Agree on the folder layout and file names before files go in. For a ready-made layout, see a sample brand asset folder structure you can copy. For file names, our guide on brand asset naming conventions covers the patterns that keep versions and formats clear.
What this step produces: a list of collections, a controlled tag list, and an agreed folder and naming scheme.
Step 4: Put the Brand Guidelines Online
Files without context lead to off-brand work. A logo file doesn't help much if the person using it doesn't know the clear space, minimum size or which version goes on a dark background.
Publish the guidelines as readable pages next to the files they describe: logo rules, color values, typography, tone of voice, and do and don't examples. When someone opens the logo section, the rules and the downloads should be on the same screen. The full process for turning a PDF brand book into web pages is covered in our guide to moving brand guidelines from a PDF to the web.
What this step produces: guideline pages for at least the core elements, each linked to the matching files.
Step 5: Set Access Levels and User Roles
Decide how access works before you invite anyone. There are three common options, and many teams use more than one:
- Public: anyone with the address can view, which suits press kits and basic logo packs.
- Sign-in or password: for internal teams and approved partners.
- Share links: a link to a single collection or file for a specific job.
Then define roles. Someone publishes files, someone approves changes, and most people only view and download. Give each person the least access their job needs; the principle of least privilege describes this as restricting access to "the minimum necessary to accomplish assigned tasks." Keep the group that can upload or edit small.
External access needs its own process. Write down who can grant access to an agency or freelancer, what they can see, and who removes that access when the project or contract ends. Access that is never removed lets old files and confidential material travel further than you intended.
What this step produces: an access model, a role for every user group, and a written process for adding and removing external users.
Step 6: Brand the Portal and Connect It to Where People Work
The portal should look like the brand it represents. Apply your logo, colors and typography, keep the navigation labels in plain language, and use your own domain or subdomain where your setup allows it. A familiar look and address also tells partners they are in the official place.
Then make the portal easy to reach from the places people already work. Link it from the intranet, the shared drive, the website footer or press page, and the team chat channels where people ask for files today. Pin the link in design files and project templates too. Keep this step practical: a clear link in the right places does more on day one than a complex integration that nobody maintains.
What this step produces: a branded portal and links to it from every place people currently go to look for brand files.
Step 7: Run a Pilot, Then Launch Audience by Audience
Don't send a company-wide announcement until a few real users have tried the portal. Pick a handful of people from your first audience, ideally from outside the brand and marketing team, because the brand team already knows where everything is.
Give them real tasks taken from the request list in step 1: find the current logo for a dark background, download the latest sales deck, find the approved product description, check whether a photo can be used on social media. Watch where they hesitate and ask them to think aloud. The Digital.gov guide to running a small usability test recommends testing with three to five people who match your intended users and not using members of your own team; the same approach works for a brand portal pilot.
Fix the labels, collections and missing files the pilot uncovers, then launch to one audience at a time, starting with the group that sends the most requests. Include a short how-to in the announcement: where the portal is, what is in it, and who to contact when something is missing. For rolling it out to agencies, freelancers and partners, our guide on how to share brand guidelines covers the options.
What this step produces: a tested portal, a fix list that has been worked through, and a launch plan by audience.
Step 8: Name an Owner and Set Up Upkeep
A brand library goes out of date without someone looking after it. Name one person as the owner, not a department or a shared inbox.
Set a review rhythm, for example once a quarter, and put it on the calendar. At each review, the owner replaces outdated files, removes expired photos and licenses, checks that guideline pages match the current files, and reviews who still has access. Keep version history so people can see which file is current and what it replaced, and move superseded files to an archive instead of leaving them next to the current ones.
Agree on a simple way for users to request files that are missing. Those requests show you what to add next.
What this step produces: a named owner, a review schedule, and a request route for missing assets.
The Setup Checklist: Owners and Done-When Criteria
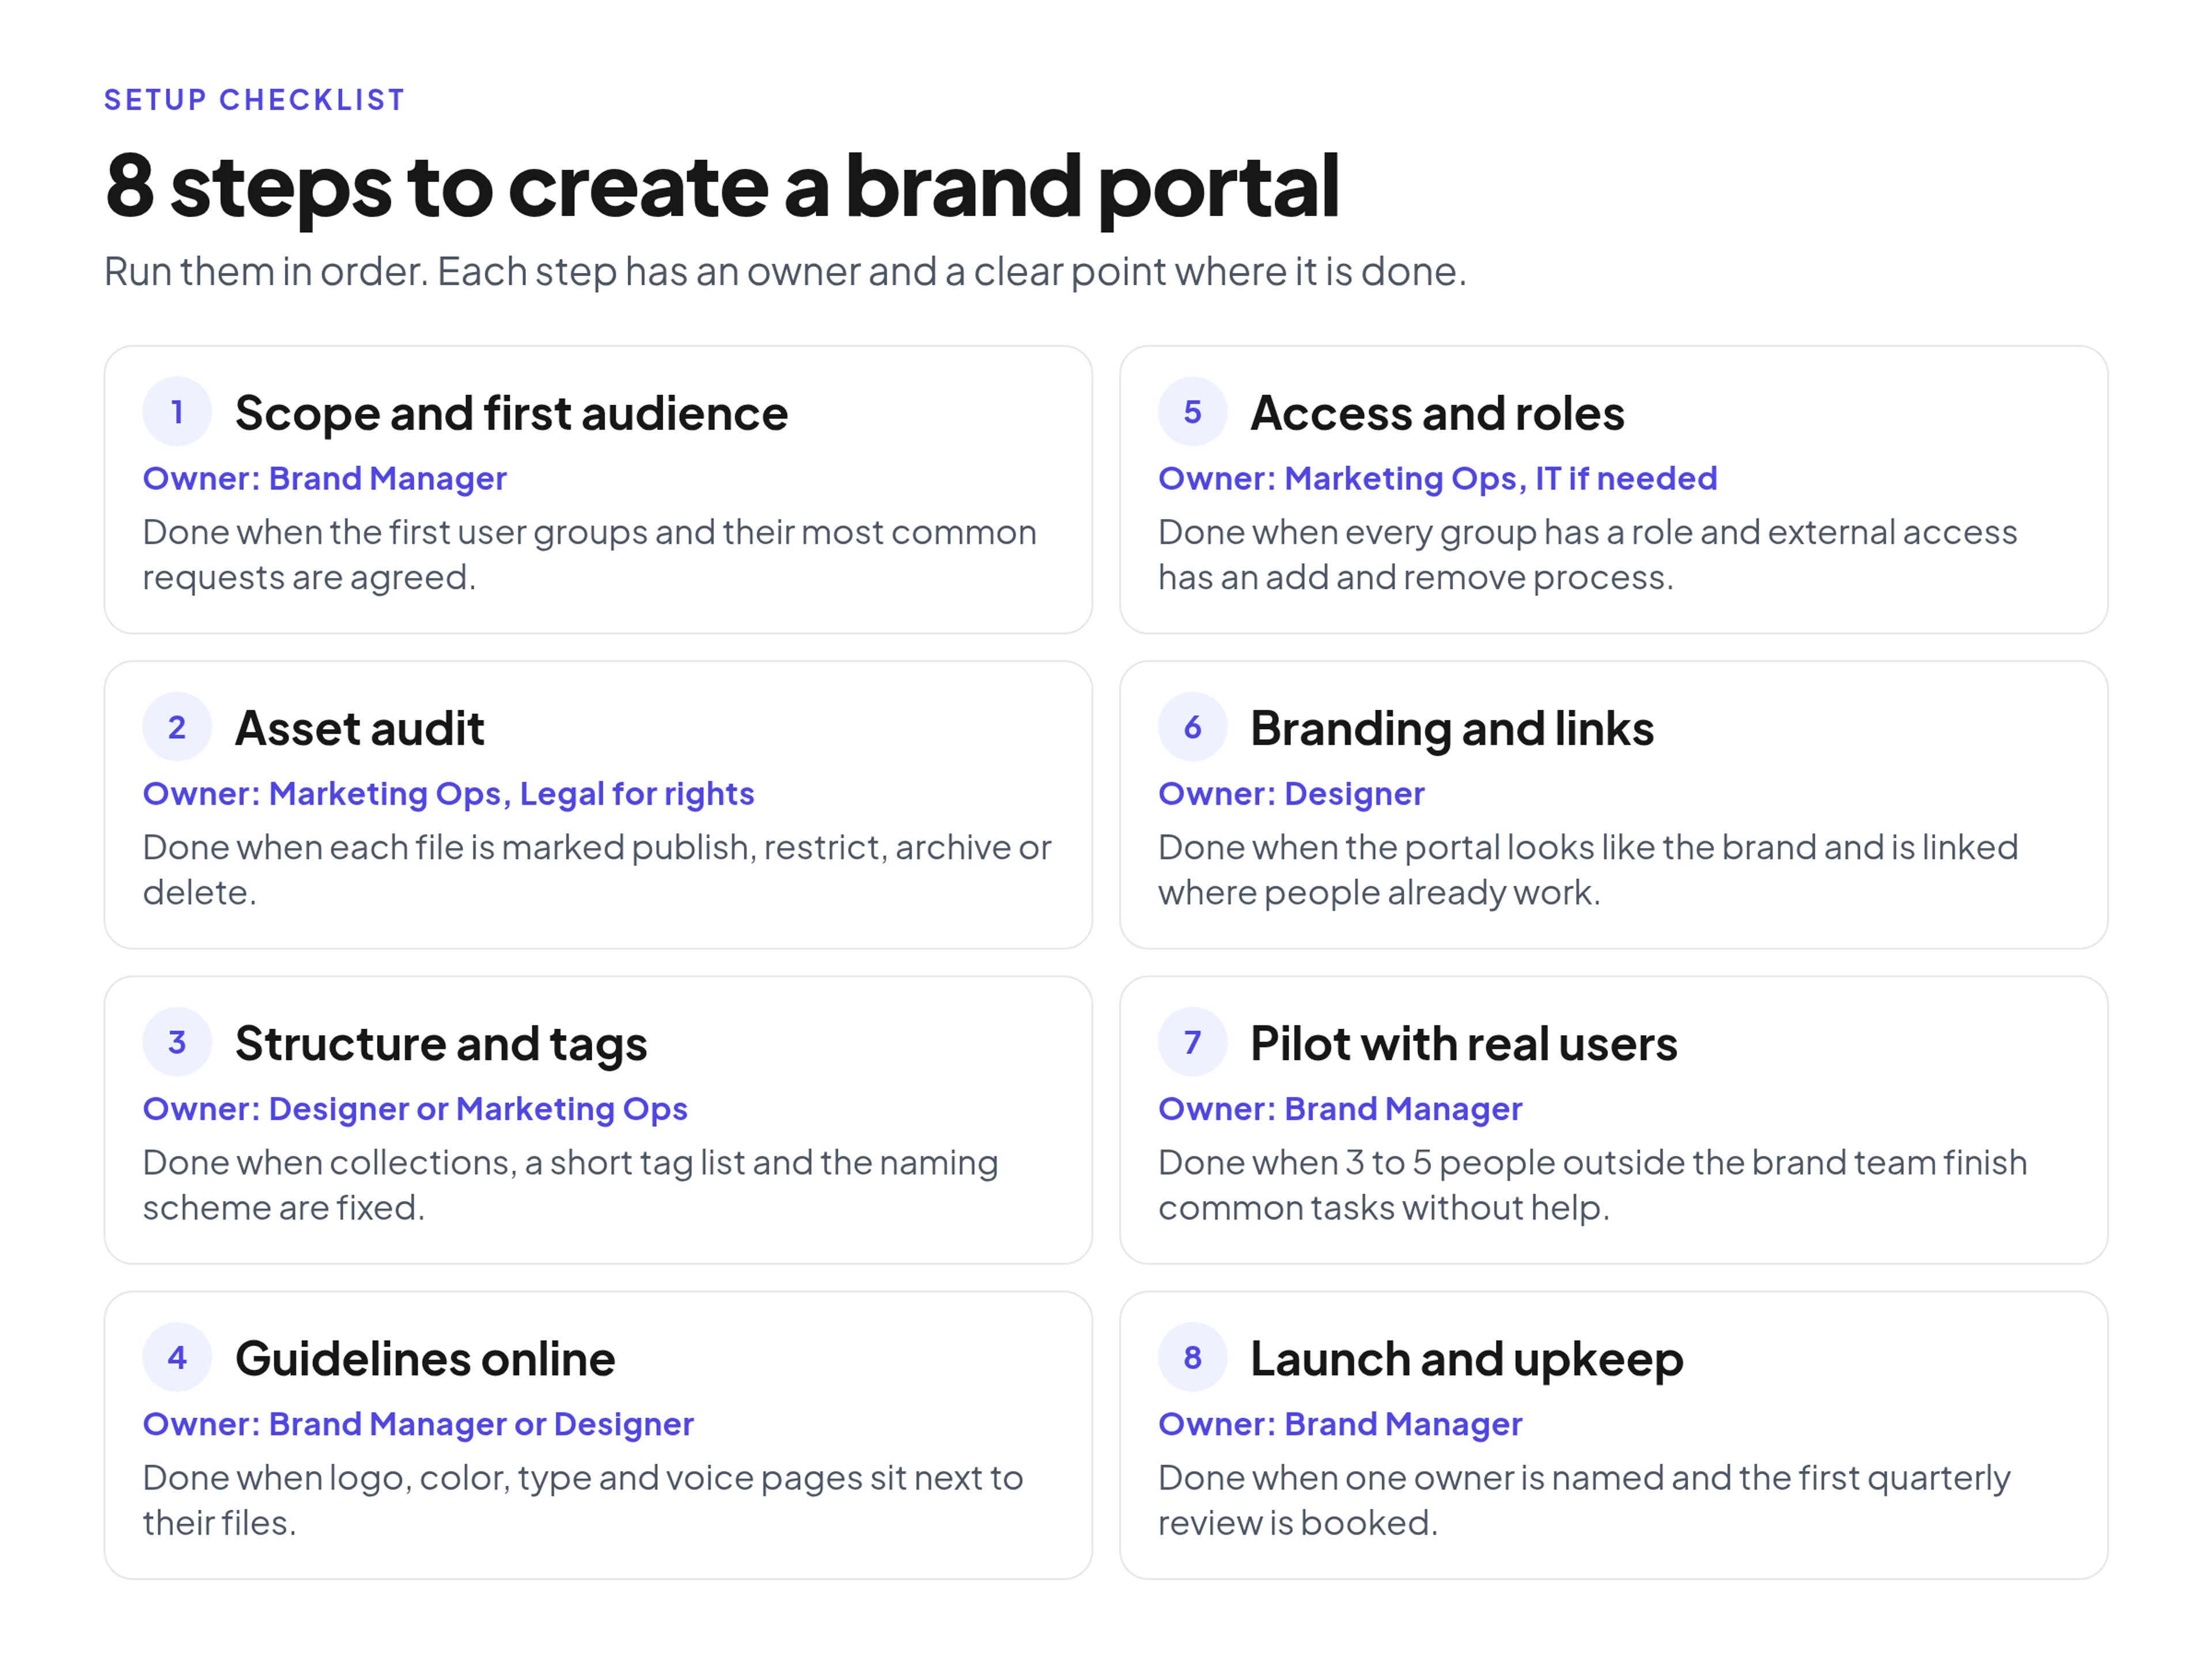
Use this checklist to run the setup as a small project. Each step names a typical owner role and a plain exit criterion, so everyone knows when to move on. Swap the roles for the people you have; in a small team one person may own several steps.
- Scope: owner Brand Manager. Done when the first user groups and their most common requests are written down and agreed.
- Asset audit: owner Marketing Ops, with Legal for usage rights where needed. Done when every file is marked publish, restrict, archive or delete, old versions are out of the main set, and assets with license limits are noted.
- Structure and tags: owner Designer or Marketing Ops. Done when the collections are named, the tag list is fixed (about ten fields or fewer) and the naming scheme is written down.
- Online guidelines: owner Brand Manager or Designer. Done when logo, color, typography and voice pages are live, each next to its files, with do and don't examples.
- Access and roles: owner Marketing Ops, with IT where sign-in or company accounts are involved. Done when each user group has a role and there is a written process for adding and removing external users.
- Branding and links: owner Designer. Done when the portal uses the brand's logo, colors and fonts and is linked from the intranet, shared drive and team channels.
- Pilot: owner Brand Manager. Done when three to five people from outside the brand team can complete the most common tasks without asking for help, and the issues they found are fixed.
- Launch and upkeep: owner Brand Manager. Done when the first audience has the announcement, the owner is named and the first quarterly review is on the calendar.
Build vs Buy: Three Ways to Set Up a Brand Portal
Before step 6 you need to decide where the portal will live. There are three common routes, and each fits a different team.
Assemble it from what you already have
A shared folder in Google Drive, Dropbox or SharePoint, combined with a guidelines page in Notion, on the intranet or on your website.
- Who it suits: small teams with a modest number of files and a limited budget.
- What it takes: time to link folders and pages together and to keep both in sync by hand.
- Where it breaks: permissions get tangled as more people and partners join, the rules and the files drift apart, and version control depends on everyone following the same habits.
Build a custom portal
Your own developers or an outside team build a portal on your website or content system.
- Who it suits: organizations with unusual requirements that a ready-made product can't meet, and the developer capacity to support it for years.
- What it takes: scoping, design and development, then ongoing developer time for fixes, permissions, storage and new needs.
- Where it breaks: upkeep. When the developers move on to other priorities, small problems pile up and the brand team can't change the portal without them.
Use a ready-made brand portal service
A hosted product made for brand guidelines and brand files.
- Who it suits: teams that want guidelines, files, roles and sharing in one place without writing code.
- What it takes: the content work in steps 1 to 5, plus a subscription.
- Where it breaks: if you need a very specific data model or workflow that the product doesn't support.
Whichever route you choose, most of the effort sits in the content work: the audit, the structure and the guidelines. The tool only changes how hard it is to keep everything current. Brandportal is one example of the third route: it keeps online brand guidelines and an asset library together, with folders, metadata and tagging, version history, share links, public or password-protected portals, and Admin, Editor and Viewer roles, and viewers are free. Paid plans include a 14-day free trial, and you can compare the plans and what each one includes.
Common Setup Mistakes to Avoid
- Moving the whole messy drive in. Duplicates and old versions follow you into the new system, and people stop trusting search.
- No owner. If everyone is responsible for updating files, nobody does it.
- Building for the brand team. The brand team knows where everything is. Label collections in the words a sales rep or a partner would use.
- Too many tags. If uploading one photo means filling in fifteen fields, people skip fields or stop uploading.
- Launching without guidelines. Logos without usage rules lead to stretched, recolored and crowded logos.
- Never removing old files. One download of last year's brochure is enough to make people doubt the whole portal.
- Forgetting to remove access. Agencies and freelancers keep access long after the project ends unless someone removes it.
FAQ
How long does it take to create a brand portal?
It depends mostly on how many assets you have and how clean they are. A small, tidy kit of logos, colors, fonts and a few templates can go live quickly once the decisions are made. A large archive with thousands of photos, regional variants and unclear usage rights takes much longer, and most of that time goes into the audit, not the setup.
Do you need a developer to set up a brand portal?
Only if you build a custom portal. Assembling one from shared folders and pages, or using a ready-made service, is mainly content, design and admin work.
Can you start small?
Yes, and it usually works better. Launch with the core logos, colors, fonts and the templates people ask for most, prove it saves the first audience time, then add photography, video and campaign archives in later rounds.
Should the brand portal replace our shared drive?
For approved, ready-to-use brand files, yes: the portal should be the one official place. Many teams keep working files, drafts and large source archives on the shared drive and publish only the approved versions to the portal.
Who should own the brand portal long-term?
One named person, usually the brand manager, creative director or a marketing operations manager. They don't need to do every update themselves, but they decide what goes in, what comes out and when the reviews happen.
Conclusion
Creating a brand portal is mostly curation, not technology. Start with the people who ask for brand files most, clean the files before anything goes in, keep the structure and tags small, put the guidelines next to the assets, and control who can see and change what. Test with a few real users before launch, then give the portal one owner and a review rhythm. Run the setup checklist above as a plan, and the result is one place your colleagues and partners actually use to find the current, approved version.